What are some properties of air? (3)
Plan Investigation 16
If you had a high-speed camera that could capture a photograph of the billions of billions of speeding molecules in a cubic centimeter of air, there would not be much to see. The actual air molecules take up only one tenth of one percent of the space they occupy. At room temperature, most of that cubic centimeter of air, 99.9%, is actually vacuum. Heat up that one cubic centimeter of air and the percent that is vacuum would increase.
Today students observe the effects of heating and cooling 1,000 cubic centimeters of air. They make annotated drawings that explain these effects in terms of heating and cooling air at the particle level. They complete the list of properties of air they began in Investigation 13.
By the end of this session students will understand that air expands when it is warmed and contracts when it is cooled and these phenomena can be explained in terms of the motion of particles.
Learning Goals
- Understand that air expands when it is warmed and contracts when it is cooled and these phenomena can be explained in terms of the particles that make up gases
- Understand the connection between change in temperature and change in particle speed
| Sequence of experiences | ||
|---|---|---|
| 1. Ask the question | All Class | 5 Mins |
| 2. Use the Particle Magnifier | All Class | 5 Mins |
| 3. Make annotated drawings | All Class | 10 Mins |
| 4. Discuss annotated drawings | All Class | 15 Mins |
| 5. Add properties | All Class | 10 Mins |
Materials and Preparation
For the class:
- Post the investigation question in a place where all students can see it.
- Properties of Air chart (from Investigations 14 and 15)
- Annotated Drawing Poster (See Resource Quick Links, also used in Investigation 6)
- The Particle Magnifier (Water-Air), using a classroom computer and projector or Smart Board
[Launch Particle Magnifer (Water-Air) in a new window] - Bubble mix (prepared earlier)
- 1 12oz plastic cup
- 1 1-liter plastic bottle
- 2 1gal buckets 1/2 filled with hot and cold water
1. Ask the question
Today students will investigate another property of air that scientists call thermal expansion. Later the class will complete their list of properties in answer to the investigation question:
What are some properties of air?
The temperature of air can change. We've all felt the difference between warm summer air and colder winter air. Explain that students are about to collect some evidence to answer the question What happens to the volume of air as it's warmed or cooled?
Demonstrate warming and cooling air
Note: The following teacher - led demonstration works well as long as the water in one bucket is noticeably warmer than room temperature, and the water in the other bucket is noticeably cooler than room temperature.
Show students the 1L bottle of room temperature air. Ask them to predict and explain their reasoning.
- What do you predict will happen to the volume of air in this bottle if we warm it? Will it stay the same, become larger, or become smaller?
- What if we cool it?
Provide a few minutes for students to gather their ideas. Then ask for a few people to share their ideas with the class. Check for students' understanding of "volume" - the amount of space the air in the bottle takes up. If the volume of the air becomes larger, it will need more space than the inside of the bottle - where is there additional space for it to move to?
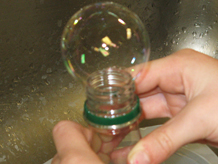
Introduce a way to test students' predictions by putting a flexible material -- a thin soap film -- over the top of the air-filled bottle, changing it from an open to a closed system, and do the following demonstration.
Narrate your procedure as you move through the steps.
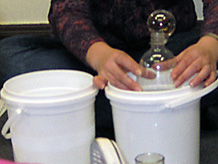
- Half-fill two plastic buckets, one with hot water and one with cold water.
- Dip the opening of a 1L bottle into the bubble mix to create a soap film that seals the room temperature air in the bottle. This turns the bottle into a closed system.
- Turn the bottle upright and place the lower half of the bottle into the hot water to warm the air.
- Place the lower half of the bottle into the cold water to cool the air.
- Repeat the process.
Note: It's important that students have an opportunity to share their ideas about why the bubble formed, but it's not important that they develop a scientifically accurate explanation at this moment. Soon they will see what happens when air is warmed and cooled in the Particle Magnifier.
Provide a few minutes for students to gather ideas about what's happening to the air to make the bubble form.
What did you observe?
- When the air was warmed, a bubble formed.
- When the air was cooled, the bubble disappeared and the soap film slid down into the bottle.
Why do you think the bubble formed?
- The warmed air expanded.
- Air entered the bottle.
- Warm air rises.
If students claim that the bubble formed because warm air rises, turn the bottle so that the bubble is lower than the bottom of the bottle. The warmed air will not rise to the now elevated bottom of the bottle, and the bubble will not deflate.
Note: The temperature increased meaning the air particles inside the bottle were moving faster, colliding more forcefully so the air expanded, pushed on the soap film, and caused a bubble to form. When the bottle of air was cooled, the particle motion decreased, so the air contracted and the soap film moved down inside the bottle.
2. Use the Particle Magnifier
Remind students that air is made of particles too small and too spread out to see. Show the Particle Magnifier once again, asking students to look for the changes that occur at the particle level when air temperature is increased or decreased. Draw attention to the connection between increased temperature and increased particle speed.
| Temp | Notes | Likely student observations |
|---|---|---|
| +50°C | Show air. |
|
| +2°C | Show air. |
|
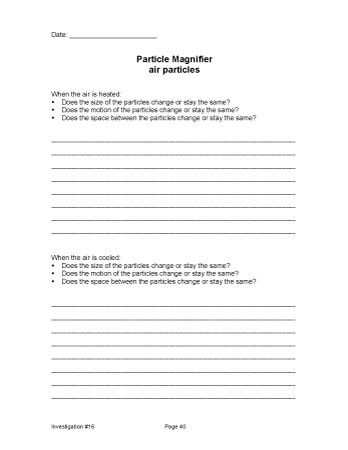
Optional: The Science Notebook page [Particle Magnifier air particles] is available for you to assign if time permits.
3. Make annotated drawings
Use the Annotated Drawing poster to review the key points about annotated drawing.
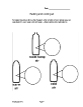
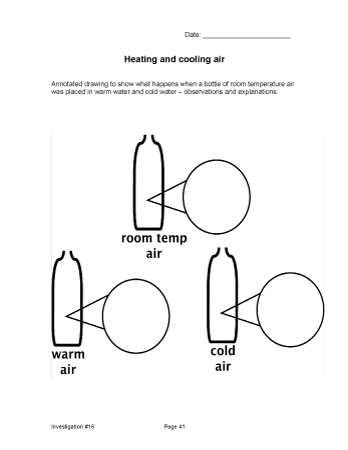
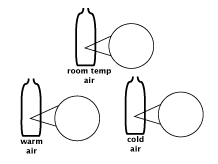
Ask students to make an annotated drawing in their Science Notebooks on the page [Heating and cooling air]. These drawings should:
- Show what happened when the bottle of air was placed in warm water and explain why it happened.
- Show what happened when the bottle of air was placed in cold water and explain why it happened.
4. Discuss annotated drawings
Purpose of the discussion
The purpose of the discussion is for students will understand that air expands when it is warmed and contracts when it is cooled and these phenomena can be explained in terms of the motion of particles.
Engage students in the focus question
How do warm air, cool air, and room temperature air differ?
Make a large sketch similar to the one in the Science Notebooks.
- Ask students how you should draw the soap film in all three bottles.
- Draw particles of room temperature air in the magnifier circle.
- Ask students to recommend how you should draw the particles in the magnifier circle for warmer air. Encourage them to refer to their own ideas that they represented in their drawings.
What is the same about the particles in room temperature and warmed air?
- They are the same size — the particles stay the same.
What is different about the particles?
- They are farther apart (are more spread out, there is more space between them).
Why did the bubble form?
- When the temperature is higher, the particles move faster and they bump into each other more often and move farther apart making the air take up more space.
- ==> The only space the air could move to was outside the bottle so the air pushed up on the soap film.
Draw the particles in the magnifier circle for the cooler air.
Why did the soap film move down into the bottle when the air was cooled?
- When the air is cooler, the particles move more slowly and they moved closer together. When there was less space between the particles, the air in the closed system took up less space in the bottle so the soap film moved down.
If you put a magnifier on air near the top of the bottle and one on the air that's near the bottom, how do you think the particles and spaces between them would compare?
- They would look the same in both places because air particles are evenly distributed in the bottle.
It is not unusual for students to think that "hot air rises" so there will be more air particles near or in the bubble and few or none at the bottom of the bottle. You may want to explain that if we were able to see the particles, we would find they are quite evenly distributed throughout the bottle.
- There will be many more air particles near the top than at the bottom of the bottle (a frequently held but incorrect idea)
Summarize the discussion and recap the investigation
To summarize the discussion, complete the properties of air chart and review the key ideas for today
5. Complete the Properties of Air chart
| Properties | Evidence or Reasoning | Particle Explanation |
|---|---|---|
| Air is invisible. | I can see through it. | Air particles are too tiny and too spread apart to see. |
| Air has weight. | I saw the filled balloons tip the balance in the last science class. | Air is matter and each air particle has a tiny bit of weight. |
| Air takes up space. | Air made the plunger of the syringe move. | Air is matter and each air particle takes up a tiny bit of space |
| Air has no odor or taste. | Personal observations. | |
| Air is compressible. | I squeezed the syringes from 12ml to 6ml and when I stopped squeezing, the plunger returned to 12ml. | Air particles have a lot a space between them so they can be squeezed together. |
| Air expands when it is warmed. | I saw the bubble form when the bottle was placed in warm water, even when the plastic bottle was held upside down. | When temperature increased, air particles move faster, collide harder, spread apart, so the air takes up more space. |
| Air contracts when it is cooled. | I saw the bubble shrink when the plastic bottle was placed in cool water. | When temperature decreased, particles slow down, get closer together, and the air takes up less space. |
Review these key ideas from today's investigation:
- Air particle size does not change with a change in temperature.
- Air particle spacing increases as temperature increases and decreases when air is cooled.
- Air particles are quite evenly distributed inside the bottle.