What can we learn about minerals by observing them carefully?
Plan Investigation 1.3
Minerals in my toothpaste ... in my pencil ... in my salt shaker — and in rocks? Yes. Scientists have identified thousands of minerals, and they show up everywhere in our lives.
Formative Assessment
Available online at inquiryproject.terc.edu
Students begin by investigating eight minerals, considering some of their properties and sharing their observations. They then return to the four rocks they studied in the last investigation to see if they can identify any minerals in them.
By the end of this investigation students will understand that minerals have specific and observable or testable properties. Students will have a clearer understanding of the difference between rocks (objects) and minerals (materials). They will also begin to appreciate the composite nature of many earth materials.
Learning Goals
- Become familiar with the common properties of minerals
- Understand the difference between rocks (objects) and minerals (the materials that rocks are made of)
| Sequence of experiences | ||
|---|---|---|
| 1. Ask the question | All Class | 5 Mins |
| 2. Explore the minerals | Small Groups | 15 Mins |
| 3. Share the data | All Class | 10 Mins |
| 4. Make meaning | Discussion | 15 Mins |
Materials and Preparation
For the class:- Post the investigation question in a place where all students can see it.
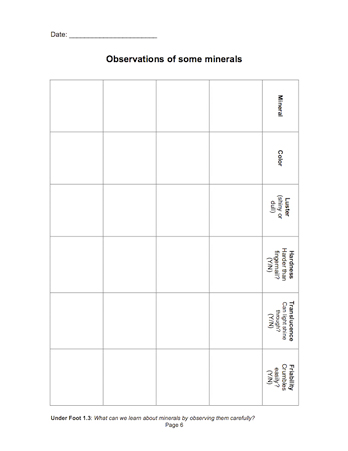
- Prepare a large–size class table, 8 rows by 5 columns, for recording mineral properties; pattern it on the table in the students’ notebooks titled "Observations of some minerals."
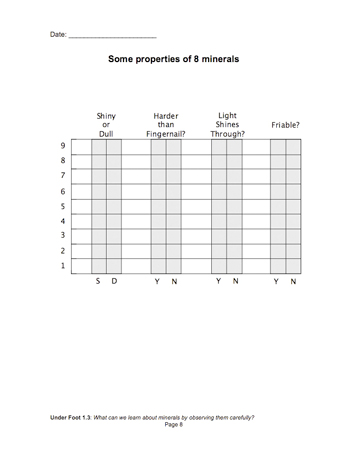
- (optional) Copy the notebook page titled "Some properties of 8 minerals" onto a whiteboard or a large sheet of paper; this is where you will make histograms of the class data.
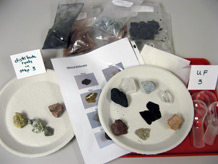
For each tray:
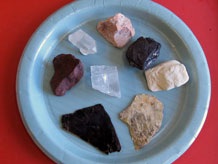
- 1 plate of 8 mineral samples: quartz, mica, biotite, feldspar, halite, hematite, talc, and graphite; this set of minerals will be used again in the next investigation
- 1 plate of 4 rocks: sandstone, granite, conglomerate, and basalt; this set of rocks was also used in the last investigation
- 2 Mineral Reference sheets
- 4 magnifying glasses
- 4 paper towels


Can students use their observations of properties of minerals as evidence that a mineral is present in a rock?
In their wrap up of an investigation of minerals, students search for familiar minerals in a small collection of rocks.
As they make claims, you’ll find evidence of their ability to use the properties of minerals the class observed (such as color, luster, translucence, hardness, friability) as evidence to support a claim.
As you interpret a student’s statement, assess the strength of the evidence the student chooses.
- Strong: I think quartz is in granite because I see grains that are shiny, translucent, hard.
- Weak: I think graphite is in granite because I see a grain that is black. The student does not take other properties of graphite into consideration such as leaving black marks on the fingers when rubbed.
After a student makes a claim, a next step might be to ask the class to take a stand on the strength of the evidence that supports the claim.
1. Ask the question
Return to the piece of quartz and piece of granite from the previous investigation.
What did you discover about quartz and granite in the last investigation?
Might the granite be made of other kinds of minerals as well as quartz?
Explain that today's investigation will focus on minerals, the natural materials that often appear in rocks. There are thousand of different minerals in the Earth. While most of these minerals are mixed together to form the different types of rocks, sometimes they are found unmixed, like the piece of quartz. Today, students will explore just a few of the common minerals, separately ... somewhat like exploring the separate ingredients for cookies before they are mixed together and baked — the sugar, the chocolate, the flour and butter.
Students may be intrigued to learn that people have found many different ways to make use of Earth's minerals. For example:
- Quartz is used as sandpaper.
- Graphite is used in pencil lead.
- Salt or halite is used on food.
- Talc is used as a powder for babies.
- Mica is often used in toothpaste.
Draw attention to the investigation question:
What can we learn about minerals by observing them carefully?
This is the same question students explored in the last class, except that instead of observing rocks, this time the class will be observing minerals. Engage the class in imagining how this investigation will go.
- Can we use the same techniques to observe minerals that we used to observe rocks?
- Do minerals have the same properties as rocks?
As you listen to the students’ responses, remind them to keep track of their ideas and questions in their science notebooks.
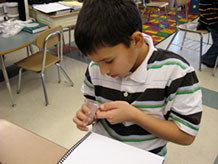
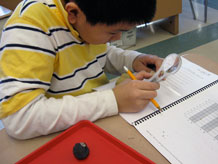
2. Explore the minerals
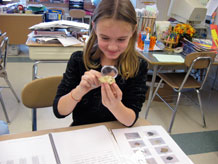
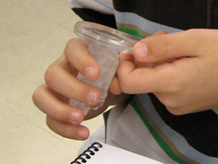
Distribute a tray of minerals to each group. The students are already experienced observers of earth materials. Have them pass the samples around, identify each mineral from the photo key, and briefly inspect each mineral by touch, by eye, and with the magnifier. Then ask each student to select two minerals for closer investigation and to record their observations in their notebooks.
Here's where the procedure differs from last time. While students are encouraged to record any information about the minerals that interests them, they are specifically asked to collect information about the following five properties of minerals. They are given a table to help them organize these observations [Observations of some minerals]. Together, review the five properties and explain how to record observations in the table.
| Property | What to record |
|---|---|
| Color | Describe the color of the mineral. If it's helpful, compare it with the color of something else. |
| Luster | Luster refers to the way a mineral reflects light. Is the mineral shiny or dull? |
| Hardness | Can you scratch the mineral with your fingernail? Use the magnifier to take a close look. If your fingernail leaves a mark, the mineral is fairly soft, answer No; if your fingernail doesn't leave a mark, it is pretty hard, answer Yes. |
| Translucence | Does light shine through the mineral? Answer Yes or No. |
| Friability | Friable means that the material crumbles easily. Can you break off small pieces of the mineral just by rubbing it with your fingers? Answer Yes or No. If Yes, the mineral is friable. |
Graphite is messy — as anyone who has ever emptied a pencil sharpener can tell you! Soft, flaky, and rather greasy, it smudges easily and leaves dark-colored marks. Students should handle the graphite sample loosely, taking care not to drop it. Marks can be removed from paper with an eraser; from hands with soap and water.
Letter from the Engineer
It comes from the Earth
Everything that people make — toothpaste, sneakers, blue jeans, eye glasses, our houses and everything in them — comes originally from natural Earth materials, not just the rocks and minerals we are exploring in class, but many, many more rocks and minerals that are found on Earth. Often different natural Earth materials are mixed together to make a new material, but everything starts off as a natural Earth material. When scientists and engineers take natural Earth materials and turn them into things that are useful to people, we call the result technology. So a pencil is considered technology, just as an automobile is, or a cell phone is.
The more scientists and engineers learn about the properties of natural Earth materials, as you have been doing, the more ideas they get for how to use those materials in different ways. For example, once people noticed that graphite is soft and slippery, and that tiny pieces separate very easily from it (friable), they realized it could be used to make marks or drawings, and eventually someone invented the pencil.
Scientists and engineers will sometimes study the same materials, but they usually have different purposes. For example, the scientist might study graphite to better understand what makes it slippery (scientists study the natural world) while the engineer might study graphite to discover how long it can hold a point before it needs to be sharpened again (engineers solve problems).
3. Share the data
Complete the class table that you prepared before class. Make sure you have consensus about the properties from all the students who observed that sample.
- Who investigated [hematite]? What are the five properties you observed? Do you all agree?
If there are disagreements, determine how you will settle them. Should they observe the mineral again? Should a third party decide?
Continue recording the data and talking about it until the entire table is filled in.
4. Make meaning
Purpose of the discussion
Use the discussion as an opportunity to elicit students’ ideas about the difference between rocks and minerals. The aim is for students to recognize how knowing the properties of minerals helps them to identify minerals in their rocks. Use the investigation question, What can we learn about minerals by observing them carefully? as the focus of the discussion.
Engage students in the focus question
To engage students in discussion, distribute the set of four rocks that they used in the last session. Ask students to explore the rocks to identify possible minerals. Color, luster and transparency are some properties that students may find most helpful as they look for evidence of specific minerals.
- Did you find evidence of any of these minerals in the rocks you examined? What properties made you think this mineral was part of the rock?
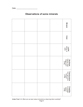
Provide a few minutes for students to record their ideas and claims in their science notebooks [Can we find some minerals in our rocks?].
Which minerals? It is likely that quartz, mica and biotite will be found in the granite sample, and that feldspar will be found in the basalt. It is possible that none of the eight sample minerals will be seen in the sandstone or conglomerate rocks.
Revisit the investigation question
What can we learn about minerals by observing them carefully?
- How did observing the properties of minerals, help you understand more about rocks?
Summarize the discussion and recap the investigation
Reinforce these ideas:
- When we look at minerals carefully, we can discover some of their properties — including color, luster, hardness, translucence, and friability.
- These properties can help us find even small quantities of particular minerals in rocks.
- Minerals are the materials that rocks (objects) are made of
(optional) Plot data

If time permits, compare the results by recording the data in the histograms you prepared before class. Students can also record this information in their science notebooks [Some properties of 8 minerals]. Note that "Color" cannot be plotted on a 2-column histogram, but you can list the colors separately.
Encourage students to help you transfer the data from the class list or notebooks to the histograms.
How many minerals are shiny?
As the data are compiled, check that students understand how to read the graphs:
Are these minerals mostly hard or mostly soft? Can you back up your claim?