Annotated Drawings
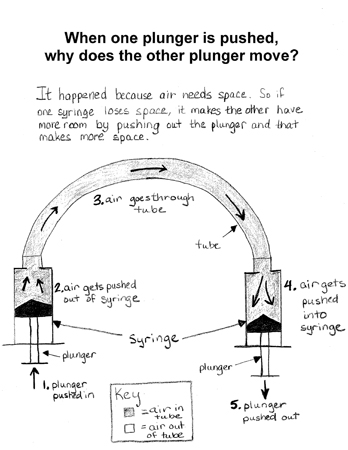
Figure 1: Annotated drawing sample
Figure 1- Sample Annotated Drawings [pdf]
- Reviewing Annotated Drawings
- Model for an Annotated Drawing Poster
Annotated drawings include a combination of notes and labeled drawings that provide an explanation about a scientific process. They are used in this curriculum to answer specific scientific questions. In contrast with an observational drawing, which represents all elements of an object or scene in great detail, an annotated drawing has a specific area of focus. Some elements of the drawing may be represented by the simplest of outlines and need no elaboration while other elements require carefully detailed drawing and explanations.
Annotated drawings are not considered finished products. They represent one's best explanation of a process at a point in time; they are works in progress. They provide a way for communicating one's thinking or model of matter with others.
Figure 1 is an example of an initial annotated drawing by a 5th grade student. It was produced immediately after students explored a small system composed of two syringes connected by a plastic tube (See Investigation 13). The purpose of the exploration is to provide evidence that air is matter and takes up space.
The question the annotated drawing must address is, "When one plunger (of one syringe) is pushed, why does the other plunger (of the second syringe) move?" The annotated drawing in Figure 1 highlights the air inside the system, by use of a color key. It uses arrows and notes to indicate the direction of movement of the air and both plungers, and addresses the question with the explanation, "It happened because air needs space so if one syringe loses space it makes the other have more room by pushing out the plunger and that makes more space."
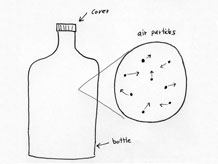
Figure 2: Annotated drawing sample with magnifier
Figure 2Another set of notes, augmented with arrows, describes the sequence: (moving clockwise from lower left)
"Plunger pushing in.
Air gets pushed out of syringe.
Air goes through the tube.
Air getting pushed into syringe.
Plunger pushed out."
How do students represent matter or a process that's invisible?
Whenever the focus of an annotated drawing is something students cannot actually see, such as the tiny particles that compose all matter, ask students to use the technique illustrated in Figure 2, which includes drawing an imaginary "magnifying lens" to zoom in and make visible something that is invisible to the human eye.
Reviewing annotated drawings
- While annotated drawings initially represent the thinking of an individual student, understanding and refining them is an important group effort.
- The goals of the review process are to:
- help students develop the ability to think critically about scientific processes
- learn how to communicate their ideas through annotated drawings
- use the all class review process to refine these ideas
A suggested review process
- After the class in which students create the annotated drawings:
- Select two annotated drawings, ideally ones that are representative of different explanations for the scientific process.
- Make enough copies to give a set to each pair of students and have one for the class.
- In the following science class:
- Explain the goal of the review: to deepen our understanding of the science by looking closely different ways people chose to explain our observations and explanations.
- Remind students of the phenomenon that is the focus of the drawings:
What observation or process do these drawings try to explain? - Provide time for pairs of students to look at the drawings through 3 lenses:
- Is there anything you don't understand and would like clarified?
(Example: Your key shows that air is colored gray but nothing outside of the system is colored gray. Do you think there is air outside the system as well)? - How are the explanations in both drawings the same? How are they different?
(Example: Both drawings show a closed system with air completely filling the space in the syringes and tubing.) - Do the annotated drawings explain your observations?
(Example: When I pushed the first plunger, the second plunger did not move right away; it moved a tiny bit later. The annotated drawing doesn't explain why this happened.)
- Is there anything you don't understand and would like clarified?
- Repeat the pair review with the whole class.
- Highlight aspects of the observational drawings that support clear communication (e.g., arrows, keys, notes)
- Summarize aspects of the explanation that are scientifically accurate.
- Provide a few minutes for students to revise their own drawings in light of what they learned in the class review.
Model for an Annotated Drawing Poster

Annotated Drawings
- Provide an explanation.
- Use simple outline drawings.
- Use a magnifier to show things too small to see.
- Use labels, arrows, and a color key.
- Add notes to explain important ideas.
You can change your annotated drawing as your understanding and your explanation changes.