Why do the water drops form?
Plan Investigation 9
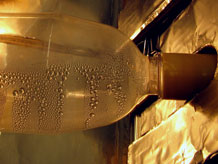
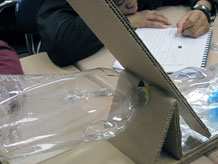
The 2-bottle systems continue to change. The inside surfaces of the bottles are covered with water droplets and intriguing patterns and gradations in the drop sizes have developed. Why does it all happen as it does? The drops actually form a map of conditions inside the system, reflecting two variables: temperature and abundance of water vapor. In the coolest and most humid places, the drops have grown largest. No condensation forms in the warmest part of the system.
Formative Assessment
How do your students explain the process of condensation?
Available online at inquiryproject.terc.edu

How do your students explain the process of condensation?
Listen to their discussion of condensation inside the 2–bottle system to find evidence that students understand that water vapor is the source of water droplets formed during condensation.
Use these criteria to interpret students’ explanations. Do students explain that:
- Water vapor in the upper bottle is the source of the water droplets on the inside surface of the bottle?
- Condensation is the transformation of water vapor (invisible) to visible drops of liquid water on the inside of the bottle?
- Condensation occurs when water vapor comes in contact with a cool surface?
Make sure that everyone in the class understands the transformation of water vapor to water. The next step is to link this process to the process of evaporation.
Today's investigation is a continuation of the work students started in Investigation 8. Students check their home 2-bottle system. After describing what is happening, they rely on both observations and reasoning to again address the process: Why do water drops form on the inside of the bottles? The role of temperature is introduced, as well as the idea that the process of condensation is the opposite of evaporation. Finally, students measure and record the weight of their uncovered mini-lakes.
By the end of this session students will connect evaporation, water vapor, particles too small to see, and condensation. They will understand that the process of condensation is the reverse of the evaporation, and they will also start to understand that temperature has an influence on the process of condensation.
Learning Goals
- Understand that the process of evaporation involves particles of water too small to see breaking away from the surface of the water and becoming a gas called water vapor.
- Understand that the process of condensation is the reverse of evaporation: water particles too small to see clump together to form visible drops.
- Understand that temperature difference is key to the process of condensation
| Sequence of experiences | ||
|---|---|---|
| 1. Ask the question | All Class | 5 Mins |
| 2. Explore | Small Groups | 5 Mins |
| 3. Share observations | All Class | 10 Mins |
| 4. Make meaning | Discussion | 15 Mins |
| 5. Weigh the mini-lakes* | Pairs | 10 Mins |
| Condensation Concept Cartoon | Individual | |
* If possible, have students weigh the mini-lakes before school starts, or during a lunch period, to have additional time during this investigation.
Materials and Preparation
For the class:
- Post the investigation question in a place where all students can see it.
- Dot Sheet 1 [pdf], Dot Sheet 2 [pdf], and Dot Sheet 3 [pdf] (See Resource Quick Links)
- 3 2-bottle systems
For each group:
- 1 digital scale
- 2 mini-lakes
- Freeze 2 trays of 1/2-inch mini ice cubes
The processes of evaporation and condensation inside the 2-bottle system
We do not suggest you present this information to your students. These ideas are presented here to help you understand some of the complexities of evaporation and condensation inside the closed, 2-bottle system.
- Condensation is related to both humidity and temperature difference. When air that includes water vapor is cooled to a lower temperature the particles of water vapor draw closer together. If the air is sufficiently cooled, drops of condensation will form. This is true even when that "cooled air" still seems warm, as it does inside the bottles. What matters is the temperature difference. Sufficient cooling of the humid air does not happen immediately below the lamp, but it does happen in most other parts of the system.
- Heat energy is necessary for evaporation to occur. Water can evaporate at very low temperatures, particularly when the humidity of the air is low. The heat from the lamp increases the rate of evaporation of water, but the lamp does not generate enough heat to evaporate anything else. However, even rocks would liquefy and then vaporize if the temperature were high enough.
- Net evaporation occurs when the rate of evaporation exceeds the rate of condensation. Inside the small 2-bottle closed system, humidity could quickly become high enough to stop net evaporation long before much water accumulates in the upper bottle. The added heat from the lamp forces net evaporation to continue even in a closed system with very high humidity.
Concept Cartoon

The Condensation Concept Cartoon is typically used as a formative assessment at the end of this investigation.
Notebook Pages
1. Ask the question
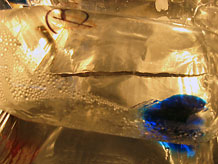
The two-bottle systems have been set up and changing for a few days by now. The inside surfaces of both bottles have areas that are covered with different sized drops of water, and a puddle may have started to form in the upper bottle.
Today's investigation question is:
Why do the water drops form?
Before students start to answer the question they'll have another opportunity to observe the bottles.
2. Explore
Ask students to spend just a few minutes observing their home 2-bottle system. Students should pay special attention to:
- Places where there are water drops.
- Places where there are no water drops.
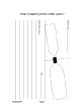
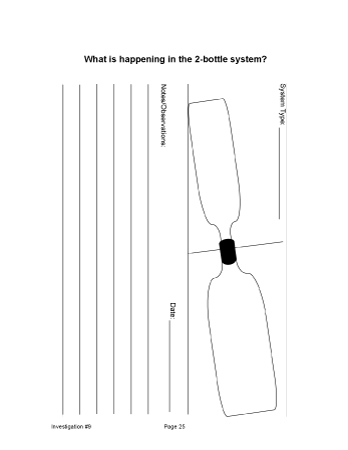
They record their observations in their Science Notebooks, on a new page titled, [What is happening in the 2-bottle system?]
New drawings of the two-bottle system are not necessary.
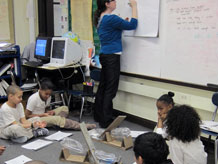
3. Share observations
Collect observable data from students about their home 2-bottle systems. As students respond, record their observations for reference during the Make meaning discussion
Where did you see water or drops of water?
- A larger area of the inside surface of each bottle is now covered with drops.
- A puddle may be starting to form in the upper bottle.
Where are there no drops of water?
- There is a large area with no drops directly under the light.
- Smaller sections of the lower and upper bottles may have no drops of water.
What is the warmest part of the 2-bottle system?
- The warmest part is the portion of the lower bottle that is directly under the light.
4. Make meaning
The 2-bottle systems look very different than they did when the class first set them up. Drops of water continue to collect on the inside surfaces of both bottles, and students have agreed that the systems are closed, so the water is not coming from outside of the 2-bottle systems.
Purpose of the discussion
The purpose of this discussion is for students to jointly construct explanations for why drops of water form on the surfaces inside the 2-bottle systems.
They are encouraged to think about particles of water that are too small to see and to consider the role that temperature differences play in evaporation and condensation. When they think about what they observe and what they think is happening in terms of particles they can't see, students are interpreting data at two scales, the macroscopic/observable and microscopic.
Engage students in the focus question
We have been investigating transformations of water in a small, closed system. Today, together, we'll see if we can explain the changes we've observed in the 2-bottle system.
What changes in the 2-bottle system have you observed and how do you explain these changes?
Note: If students use the terms "evaporation" and "condensation", ask for details. What is the story behind the word evaporation, or condensation? What do those terms mean? Explaining what is going on is challenging as it requires students to move beyond what they can observe and to explain what can't be seen. They must move back and forth between visible evidence and inference. This discussion is an opportunity for students collectively to put pieces of the explanation into a coherent whole as if they were solving a puzzle together.
Listen for explanations that include the idea that water particles too small to see leave the puddle, move into the air inside the bottles, and are now a gas called water vapor. When enough particles of water vapor cluster together on the cooler surfaces of the bottle, they form visible drops of water.
We started with a puddle of water in the lower bottle and no water in the upper bottle. Now we see water drops on the inside surfaces of both bottles. But I didn't see any water moving from one bottle to the other. How would you explain that?
- Particles of water too small to see break free from the surface of the puddle in the lower bottle. Those particles, that are too small and too spread apart to see, form a gas called water vapor. The water vapor travels throughout the two bottles as part of the circulating air.
We seem to agree on how water particles behave during evaporation. But what about water vapor turning back to liquid water drops - the process we call condensation - how do these water particles behave?
- The water particles in the air are spread far apart. When lots of those particles cluster together they become visible again, as water drops. This doesn't happen everywhere in the 2-bottle system.
Water drops don't form in every part of the 2-bottle system. Can we figure out what's different about parts of the bottle where there are no drops and parts where are lots of them?
- There are no drops on the surface close to the lamp where it's warmest so maybe it needs to be cool for water vapor to become liquid water drops (a process called condensation).
Have you noticed other places where water drops form?
- Water drops form on the sides of a can or glass that holds a cold liquid.
Do you think it is accurate to say that evaporation and condensation are reverse processes? Explain.
Summarize the discussion and recap the investigation
Using the same language students have used, summarize their main ideas.
In your summary, use the three Dot Sheets to reinforce the concept that particle spacing as well as particle size has a significant influence on our ability to see the particles.
Include the following key ideas:
- Particles of water, which are too small to see individually, break free from the surface of the puddle of water and move into the air.
- These invisible particles form a gas called water vapor, which becomes part of the air and circulates inside the 2-bottle system.
- When the invisible water particles bunch together, they form visible drops on the inside surfaces of the 2-bottle system. This process is called condensation.
- Condensation is not happening on the warmest surface of any one of the three 2-bottle systems.
As you recap the investigation, be sure there is understanding of these points:
- You made new observations of the three 2-bottle systems.
- You discovered that drops of water cover most but not all of the inside surfaces of the systems.
- The warmest part of each 2-bottle system is dry.
- There is now evidence that water isn't destroyed as it evaporates. In the closed 2-bottle system, the only source of the condensation is the water vapor that originally evaporated from puddle in the lower bottle.
Letter from the Engineer
The Two–Bottle System
The two-bottle system you have been using is an example of a design created by two engineers. They followed a design process that is highlighted below:
- Define the problem
The problem they faced was:
“What can we build that will help answer the question?”, “What happens to water when it evaporates?”
- Identify the Criteria
The important features of a design, the features that allow us to know if the design is a success, are called criteria. The criteria for the two-bottle system included:
- It must be a closed system (if water still exists after it evaporates, the instrument must capture it).
- It must have two separate places that can hold water, so we can tell if water moved from its original location to a new place.
- People must be able to see what is happening.
- Identify the Constraints
There were also some restrictions, or what engineers call constraints:
- It must be safe for use in a 5th grade science classroom.
- It must be made from simple materials, so it is not very expensive.
- It must be sturdy, not break easily.
- It must be easy to set up correctly and use.
- Whatever is going to happen needs to happen quickly, so people don't get bored waiting forever to see what might happen.
- Pose solutions
The engineers made lots of different sketches that they thought might work, and talked about the possible designs.
- Test and Evaluate Solutions
Then over the course of several weeks, they built and tested five different versions of the two-bottle system, improving it each time to better match the criteria and the constraints, before they built the version you have in your classroom.
You decide:
- Did the two-bottle system allow you to answer the question, “What happens to water when it evaporates?”
- Does it meet the criteria?
- Does it comply with the constraints?
What changes would you make to improve the two-bottle system so that it does a better job?
Continuing to observe the 2-bottle system
Given enough time, all of the water in the lower bottle will evaporate, leaving it dry, and will condense in the upper bottle. We recommend you leave the light on overnight and across weekends but not during school vacation periods. If you leave the lamp on continuously this change typically takes about a week. It will take significantly longer if the lamp is on only during school hours.
If the water in the lower bottle has not evaporated and condensed in the upper bottle by the time your class completes this unit, leave the 2-bottle systems in place and encourage your students to check them once or twice a week until the process is complete.
Students will find additional line drawings for the 2-bottle systems and spaces for notes and observations in the Science Notebooks that they can use to record any further observations.
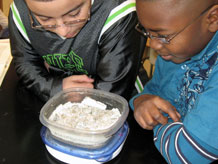
5. Weigh the mini-lakes
Students record the date, day number, the weight, and any changes to the mini-lakes in the Data Table: Weight of mini-lake and on the Weight of mini-lake over time graph in their Science Notebooks. Remind them to include the cover in the weight.
How long do students continue to weigh mini-lakes?
It is critical that students continue to weigh their mini-lakes until all the water has evaporated. How will they know when all the water is gone? The most important source of evidence is the weight data: the weight stops decreasing and the line connecting the points on the graph levels off. This evidence is supported by observations that the lake looks and feels dry. If time permits, you may ask students to figure out how much the mini-lake will weigh when evaporation of water is complete. (Weight of mini-lake with salt added minus weight of water added to the mini-lake originally.)
Time for weighing the mini-lakes is not built into the rest of the investigations. You will need to make a plan that works in your situation. By now students are able to weigh their mini-lakes independently. Can they weigh their lakes before school? Or before you begin science class?
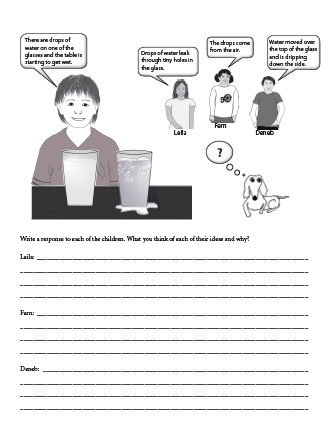
Condensation Concept Cartoon
Learn about Concept Cartoons in the Concept Cartoons section available from the sidebar.by clicking the Assessment tab at the top of the Grade 5 curriculum Home Page.
This cartoon is designed to probe students' ideas about condensation. Three cartoon characters argue about an explanation for the appearance of water droplets on the outside of a glass of ice water. Ask students to follow along as you read the cartoon prompts and directions aloud. Remind students to respond to the pros and cons of each idea. Students' responses will give you insight into their understanding of the transformation of water from a vapor to liquid water drops and help you decide whether the class as a whole or individuals are ready to move on or if they would benefit from a review or additional experience with classroom activities.
You may want to provide time for students to revisit and revise their responses at the end of Investigation 10.