What are things in my world made of?
Plan Investigating Materials 1
Scissors … windows … lunch boxes … sneakers. These are the kinds of objects that children see every day. They give them more attention than you might realize, and they have a lot of ideas about them – what they're made of, how they work, what they're worth.
Formative Assessment
Can students distinguish between objects and the materials they are made of?
Available online at inquiryproject.terc.edu
In this investigation, you will explore some of your students' ideas about what things are made of and how different materials behave. You will help them distinguish between “objects” and "materials," and you will help them identify different kinds of materials, such as metal, plastic, and wood.
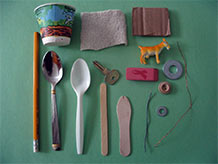
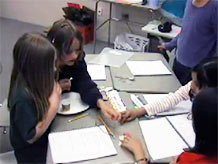
Students will first explore a collection of everyday objects that you supply, including a paperclip, a pencil, a popsicle stick and a key. Then they will sort these objects into groups according to their materials. Students will also explore the classroom to notice additional objects and the materials from which they are made.
By the end of the investigation, the children will be looking around the classroom with the eyes of a scientist, wondering about the materials objects are made of.
Learning Goals
- to distinguish between an object (e.g., a key) and the material it is made of (e.g., metal)
- to understand that some objects (e.g., spoons) can be made of different materials (e.g., wood, metal, and plastic) and that some objects are made of more than one material (e.g., pencils)
- to observe and record details
| Sequence of experiences | ||
|---|---|---|
| 1. Ask the question | Discussion | 15 Mins |
| 2. Sort objects by materials | Small Groups | 15 Mins |
| 3. Make meaning | All Class | 10 Mins |
| 4. Find a personal object | All Class | 5 Mins |
Materials and Preparation
- Post the investigation question in a place where all students can see it.
- Post the following title on a whiteboard or flip chart: “Materials and What We Know About Them.”
- Set aside a separate set of materials for group discussion.
- piece of cardboard, approx 2"x2"
- plastic-covered copper wire,approx 6" long
- bare copper wire; approx 6" long
- piece cotton cloth fabric, approx 2"x2"
- wooden spoon (ice cream type)
- metal spoon
- plastic spoon
- metal key
- steel bolt
- 3-oz paper cup
- rubber eraser
- plastic counting bear
- steel washer
- wooden coffee stirrer
- pencil
Notebook Pages

Can students distinguish between objects and the materials they are made of?
Observe students as they work in groups and listen to their small group discussion. Look and listen for evidence that they can distinguish objects from the materials they are made of.
Use these criteria to interpret students' work:
- Do they create sorting categories based on kind of material (metal, plastic, wood products, rubber) and not objects (spoons)?
- Is there a group for every object?
- Do students recognize that some objects made of more than 1 material (covered wire, pencil) and how do they deal with these? (stretch across groups, create category called "more than 1 material")
Your next step might create a new set of sorting categories for the same collection of items students used; ask students to use a stickie note to "agree" or "disagree" with your sorting scheme and explain their reasoning.
1. Ask the question
Let the children talk freely about the question for a couple of minutes, providing only the most open-ended prompts, also in the form of questions:
- What could this question mean?
- How could we ever answer it?
- What might a scientist do to answer this question?
Note: Until you know what words the children are comfortable using, use non-technical ones and introduce the scientific terms later. In this first example, the terms “thing” and “stuff” will soon be replaced with the terms “object” and “material”.
Bring the discussion around to specific objects and materials. Look around the room and spot an object.
- What stuff (or material) is it made of?
Model how you’d like students to first name the thing and then the stuff from which it is made. Use a couple of objects from the set that students will use.
- This object I’m holding is a block, and the material it’s made of is wood.
- This is a small bear, and the stuff it’s made of is plastic.
Continue eliciting examples until you are sure students understand the difference between objects and materials.
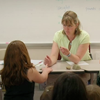
How one teacher started
Jen allowed time for her students to write their ideas about the question before discussing it as a group.
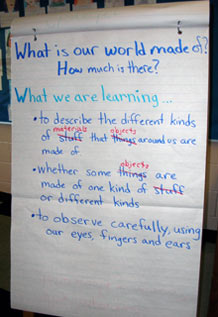
Here is Jen’s chart with the investigation question and the goals. Note that as children discuss the goals, the word ‘stuff’ is replaced with ‘materials’ and the word ‘things’ with ‘objects’. Jen facilitated this change by asking, “Is there a more scientific word we could use?” The children came up with the more precise language on their own. If they hadn't, she would have supplied it.
Explain that some of the things students will explore may be made of stuff that’s more difficult to identify but that looking, feeling, or tapping and listening carefully, they’ll learn more about what kinds of ‘stuff’ are used in making the things that they see everyday.
Finally, pass out the set of prepared objects to each group. Let students know that their job is to think about what each object is made of, and then sort the objects into groups according to their materials. Explain that there is more than one way to sort the objects and how they go about it is up to them.
Introduce the student notebooks
Tell students that, like scientists, they will be keeping a record of their work and their results in a notebook that they will bring to every science class. Let them know that their notebook entries can include many different kinds of science information, including drawings, writing, charts, and graphs.
Encourage students to think of their notebooks as a place to record ideas and questions, too. The distinction data and ideas will not be a simple one for young students and will require regular attention and feedback as you review their notebooks.
2. Sort objects by materials
This is the heart of the investigation, the place where children make their thinking about materials explicit by sorting objects into groups according to their material properties. Encourage them by saying,
- Put the things together that are made of the same stuff.
- Make as many groups as you need, and give each group a name.
- Discuss your choices with your workmates.
You will likely hear a good deal of discussion about what constitutes "sameness." Are bright metals and dull metals the same? Should the plastic spoon be grouped with the plastic bag, even though one object is rigid and one is floppy? Students may also show some uncertainty about how to group objects made from more than one material. Remain neutral on these matters, asking the students what they think.
Some students may group objects according to their use rather than their material, e.g., putting the three spoons, the paper cup, and the plastic bag together as "kitchen stuff." Agree that this is one way of grouping the objects, but ask them to try doing it another way, putting things made of the same kind of stuff together. Give them time to try different groupings.
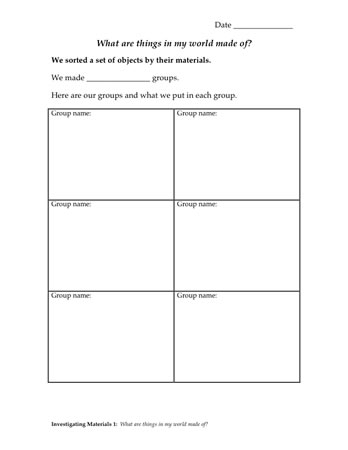
When students are satisfied with their groupings, they should record their findings in their notebook. If they created four groups, they should use four boxes. Students should include the following:
- Give each group a name or title.
- Use drawings or words to show what objects they put in each group.
Also encourage students to record any questions or ideas they have in their notebooks.
3. Make meaning
Sharing the Findings
Classroom Case
Listening
It's All About Listening
Available online at inquiryproject.terc.edu
Have students meet in a discussion circle with their notebooks. Read the investigation question and ask students if they think they are getting any closer to an answer.
Using the collection of objects you set aside for group discussion, have one team show how they grouped the objects. Establish names for each group of materials, such as metal, wood, plastic, cardboard, rubber, etc.
Ask another team to say what is different about the way they grouped the objects. Ask them to explain why they put different things together.
Explain the way each team grouped these objects by materials is the information the class will use to answer the investigation question. Scientists call would call these observations “data.”
Making Meaning
In this investigation, students’ observations are data they will use to answer the investigation question.
Purpose of the discussion
The purpose of the discussion is for students to use data to
- connect the investigation question and their data.
- reason about why there is variation in the groupings.
- make statements (claims) about the materials that objects from the classroom (things in my world) are made of and to describe the supporting evidence.
Engage students in the focus question
Ask students to look in their Notebooks and see what materials the objects they just worked with are made of.
The investigation question is:
What are things in my world made of? Based on your work with this set of objects, how would we answer this question? [metal, wood, plastic, cardboard, or fabric]
Pay special attention to the objects that cross boundaries. First are the spoons, which are made of three different materials (wood, plastic, and metal). Second are the pencil and the covered wire, which combine two or more different materials in the same object.
How did you decide where to put an object made of more than one material such as the covered wire or the pencil?
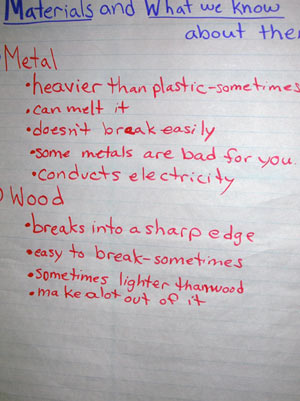
Ask students to think about what they know about each of the main materials: metal, wood, plastic. Ask questions like the ones listed below. Collect their ideas in a list for all to see.
- How are the metal objects alike?
- How do you know something is metal?
Repeat for wood and plastic. Once again, point out the investigation question. Invite children to share new insights and questions.
Extending Ideas
(As time permits) Working in pairs, invite children to look around the room and notice objects or parts of the room (e.g., the ceiling, the floor, the walls, the door, the flag) and identify the materials they are made of. Alternatively, this task can be cast as an “I Spy” game. Have pairs share their most interesting finds before ending the lesson.
4. Find a personal object
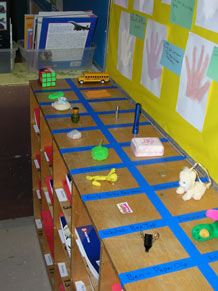
One teacher established a special place in the classroom for storing the personal objects and called it the “Class Museum.”
Ask each child to find a small object at home, something that fits into a pocket, that they can bring to school the next day and leave there, for use during the study. The objects should not have much monetary value and might include such things as a plastic animal, a metal car, an empty purse, a key fob, or a bottle cap. You may want to refer to these objects as personal objects.
You can store the collection of objects together where children can easily reach them, or set them aside in a box where you can retrieve them whenever personal objects are used in the unit.
Alternatively, you can collect a set of small objects from the classroom as personal objects, for use throughout the unit.