How are materials the same and different?
Plan Investigating Materials 3
So far the class has considered a collection of miscellaneous objects: pencils, paper cups, spoons, and so on. Now it’s time to introduce some comparability into the inquiry. It’s time to meet … the cubes.
Students work with a set of 8 cubes, all the same size but each made of a different material. They each carefully examine two cubes and record their observations about the materials. Then they share their findings in a class list, describing all 8 cubes.
By the end of the investigation, students will be comparing and contrasting materials in terms of their physical properties.
Learning Goals
- to describe materials by their physical properties
- to compare and contrast materials according to their properties
| Sequence of experiences | ||
|---|---|---|
| 1. Ask the question | All Class | 10 Mins |
| 2. Investigate two cubes | Small Groups | 15 Mins |
| 3. List material properties | All Class | 10 Mins |
| 4. Make meaning | All Class | 10 Mins |
Materials and Preparation
For the class:- Post the investigation question in a place where all students can see it.
- Prepare a class table to record students’ findings; an example is shown in Step 3.
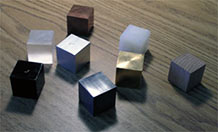
- A full set of 8 material cubes, each cube labeled with the name of its material:
- pine
- oak
- steel
- copper
- aluminum
- nylon
- PVC
- acrylic
Notebook Pages
1. Ask the question
Remind students that they have been investigating some interesting objects and their materials. Recall some of the materials they examined last time: e.g. glass and plastic. Introduce today’s question:
Brainstorm some ideas.
- How would you describe glass? How would you describe plastic? Which words are the same? Which are different?
- How would you describe wax? How would you describe jello? Which characteristics are the same? Which are different?
Point out that it is sometimes difficult to compare two materials if their objects are very different. For example, erasers and truck tires are sometimes both made of rubber, but they are so different, you might never have realized that.
- What if the objects were the same, and only the materials were different? Would it be easier or harder to compare the materials?
Now introduce the cubes, letting the students know they will be working with these cubes for the next few weeks. Explain that the cubes are all the same size and shape, but each is made of a different material. Take up the cubes one at a time and name each material so students have a chance to hear the words spoken aloud:
- pine
- oak
- steel
- copper
- aluminum
- nylon
- PVC
- acrylic
Note: See the Science Background for more information about the cube materials.
Encourage the children to comment on these materials, perhaps naming its source, remarking on its appearance, or naming some objects they know are made of the materials.
In today's investigation, we’ll examine these materials scientifically — by observing their properties and recording our findings.
2. Investigate two cubes
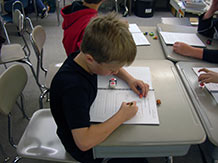
In their first encounter with the cubes, students are given freedom to explore the materials in many different ways. Working in pairs, they closely examine two cubes at a time, both singly and side by side. Because the objects are the same, the investigation offers a controlled comparison of the materials, which focuses attention on their physical characteristics.
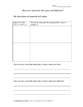
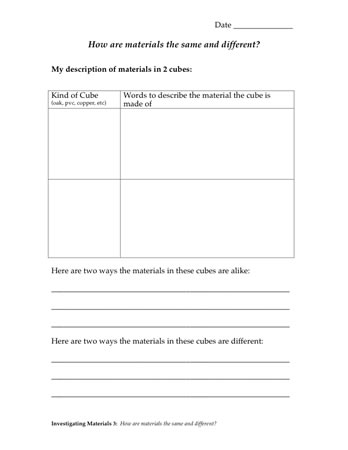
Distribute two cubes to each student. Tell each student that they will become the “expert” on their two cubes. Each group of 4 students should have a full set of 8 cubes. Working in pairs, students will examine four cubes; each student will describe two of these materials in their notebook, using the page titled, “How are materials the same and different?”
Note: In this exercise, students may again confuse object and material. Words that describe a material will include information about such properties as color, texture, odor, and luster. Words that describe the object (in this case the cube) will include information about size, shape, and weight.
Encourage students to “think like scientists,” using their powers of observation and their senses — but not taste –– to help them describe each material. If they need help getting started, prompt them by saying,
- What color is the material? Is it shiny or dull? What else can we learn by using our eyes?
- Is the material rough or smooth, warm or cool? What else can we learn by touching it?
- Can we learn anything with the help of our ears, maybe tapping the material with a fingernail?
- Can we learn something by sniffing the material? By squeezing it?
To help students understand the difference between describing the cube and the material, you can provide this suggestion. When I describe a material, my description will be true even if I cut off a tiny piece of the material, or if I have a huge piece of the material. If the material has a silver color and is hard, and I cut off a piece, the piece will still have a silver color and will still be hard. So that’s an idea you can use to check if you are describing the material or the object.
- Will my description still be true if I have just a tiny piece of the material, or a huge piece of the material?
Encourage students to compare their two materials side by side, and to record the important similarities and differences in their notebooks. Also encourage students to use strong, accurate, and descriptive language. Is the material “smooth” or is it “slippery”?
As you move among the groups, listen for signs that students are beginning to think not only about descriptions (e.g. red, rough, and cold), but about categories of descriptions (e.g. color, texture, and temperature) that will help them compare and contrast the materials.
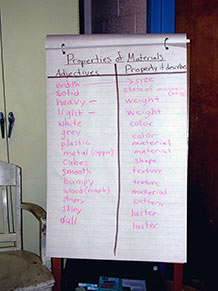
3. List material properties
Turning to the class table, ask all the students who are pine “experts” to meet, compare notes, and write their descriptive words in the first column. Watch for duplicates, and encourage use of words that will aid in comparison, e.g. color, odor, and texture. Occasionally ask a student to defend a description, e.g.,
- What do you mean the acrylic is transparent? Show me.
If students do not understand a description, or if there is disagreement about an attribute, pass the cube around for further investigation. The Investigation Question is about similarities and differences, so consensus is important. Continue through the set of materials until the table is complete.
Students will likely describe the pine cube as “light” and the copper cube as “heavy”. To help students make an initial distinction between “heavy” and “heavy for size” raise the following questions:
Note: If a student describes an attribute of the cube instead of the material (e.g., sharp corners, 6 sides, or square), point out the mistake, reminding the class of the difference between an object and its material.
- What about a very big piece of pine? Would it be light?
- What about a very small piece of copper? Would it be heavy?
- So is simply being “heavy” or “light” a property of the material or of the cube?
- What might be a better way to describe what is different about pine and copper?
The pine cube is “lighter for its size”, the copper is “heavier for its size”. If you had two very large cubes of pine and copper, both would be heavy, but the copper would be much heavier for its size. Similarly, if you had two very small pieces of pine and copper, both would be light, but copper would still be heavier for its size. Encourage them to list heavier and lighter for size as a property of materials.
Once the table is complete, tell students that there is a special word to describe the qualities of a material; that word is properties. Model the use of the word:
- The properties of pine include … (read the students’ list).
- The properties of oak include … (read the students’ list).
| Pine | Oak | Steel | Copper | Aluminum | Nylon | PVC | Acrylic |
|---|---|---|---|---|---|---|---|
4. Make meaning
Purpose of the discussion
The purpose of the discussion is to consolidate students’ understanding of the terms “property,” “similarity,” and “difference”.
Engage students in the focus question
Ask students if they think they have information to help answer the investigation question:
Suggest that students look for properties that are listed under two or more materials. Some possible findings:
- Aluminum and nylon are both smooth.
- Pine and oak both have stripes, or show the grain typical of wood, but none of the other materials do.
- Wood, pine, and aluminum are not shiny but the other materials are shiny.
- Steel feels cold but none of the other materials do.
- The materials have different colors.
- Steel seems hard when I tap on it, but pine does not.
- Acrylic is the only transparent material.
- Steel and copper are heavier for size than pine or oak.
Summarize with the following:
- How do properties of materials help us to think about how pine and aluminum are alike and different?
Tell students that they will continue to work with these cubes of materials for several more weeks, and that they will discover more about their properties. Make a copy of the class table on a large sheet of paper and save it so students can add more information as they go along.