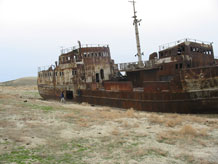
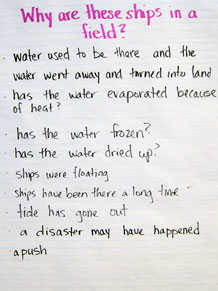
Why are these ships in a field?
Plan Investigation 1
Staecker, via Wikimedia Commons
Why are these ships in a field? Part of the answer is evaporation, but how could evaporation happen at this scale? And where is all that water now? The investigations students encounter over the next few weeks shed light on this mystery. By the end of the unit, they know the full story behind the ships in the field.
This unit investigates transformations of water over time and we begin with the example of a lake. It's not practical to study an actual lake, but what if we could we simplify and shrink things down to the size of a sandwich box? Could a simplified version of a lake help us understand some important processes that occur within larger bodies of water? Students begin building their own mini–lakes, but do not complete them until the next science class. As they build, they keep track of the amount of material in their lake. This “accounting” provides a way to study how and why materials change. Students will continue to observe their mini–lakes throughout the unit. Find a good place in your classroom to keep the collection of lakes — your class's own Lake District!
By the end of this investigation students will understand how to weigh the amount of each material in their mini–lake and that weight can be used as evidence to track transformations of matter throughout the unit.
Learning Goals
- Understand that the classroom mini–lakes are physical models that will help students understand the processes that occur in real lakes
- Measuring and recording weight is a way to keep track of matter
| Sequence of experiences | ||
|---|---|---|
| 1. Introduce the unit | All Class | 5 Mins |
| 2. Elicit ideas | All Class | 10 Mins |
| 3. Introduce the mini-lakes | All Class | 5 Mins |
| 4. Weigh materials | Pairs | 25 Mins |
NGSS* Alignment
 Three Dimensional Learning
| Disciplinary Core Ideas | 5-PS1-1, 5-PS1-2 Materials have weight and take up space and are matter. |
| Practices | Developing and Using Models: Students weigh earth materials and use them to build a "mini-lake," a physical model of a real lake. |
| Crosscutting Concepts | Systems and system models: students measure components of a mini-lake system and track changes in weight over time. |
*NGSS is a registered trademark of Achieve. Neither Achieve nor the lead states and partners that developed the Next Generation Science Standards were involved in the production of this product, and do not endorse it.
Materials and Preparation
Preparation:
- Read Why are these ships in a field? (See Resource Quick Links)
- Science Notebook for each student
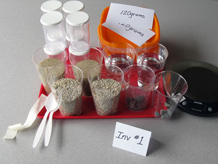
- Prepare 12 index cards, 3 labeled “120 grams”; 3 labeled “130 grams”; 3 labeled “140 grams” and 3 labeled “150 grams”
For the class:
- Post the investigation question in a place where all students can see it.
- Set of images of "ships in a field" (pdf or ppt formats) or notebook pages[pdf].
- Computer and a system for projecting the images if using electronic presentation.
- Prepare a sample mini–lake. Use 120g of sand and 120g of gravel to prepare a small lake bottom and shoreline in a sandwich box. Add 120g of water and a few small rocks around the perimeter of the shoreline.
- Have one set of materials available for use during the introduction.
For each group:
(Each group assumes 4 students. You may need to adjust the groups to suit your class size and configuration.)
- 1 6in strip of masking tape
- 2 index cards, as prepared above
- 2 plastic spoons
- 2 sandwich boxes with covers
- 2 12oz cups 2/3 full of sand
- 2 12oz cups 2/3 full of gravel
- 2 12oz cups 2/3 full of water
- 2 12oz cups each holding 8 small rocks
- 8 plastic vials with covers
- 1 digital scale; Number and assign each scale to a group for use throughout the curriculum. This will help students get consistent results in the event of small differences between scales.
Note: Students weigh the sandwich boxes and covers in this investigation. They do not assemble mini-lakes until the next investigation.
Notebook Pages
1. Introduce the new science unit
Form a discussion circle
Explain that the topic of this new science unit is water and the different ways it can change or transform. Explain that students will be engaged in a series of investigations. Each class will start with a question to investigate; sometimes the class will need more than one session to collect evidence to answer a question.
Letter from the Engineer
You may know something about the work that scientists do. Some study the stars and planets. Some study the different plants and animals on Earth. Some study the non-living parts of Earth, such as the rocks, ice, and oceans. All scientists study the natural world to learn more about how it works. They notice changes and they try to understand why the changes are happening. They ask questions, and they often work with other scientists to try to find the answers. For example, scientists might ask, “Why did the birds that use to come here every summer stop coming? What happened? What is different now?” Scientists can spend years trying to answer their own questions. They make careful observations, they take notes, and they work to make sense of the information or data they have collected.
Scientists sometimes work with engineers, but the main job of an engineer is different than the scientist’s. The main job of an engineer is to solve problems, usually to provide people with something they need or want. Engineers also ask themselves questions, but their questions are about the problems they solve. They ask, “How can we build a car that uses less gasoline?” or “How can we build a robot that will help scientists explore Mars?” Engineers also study the materials that are used to make objects. They might ask, “Will this object work better if it is made from plastic or made from wood?” or “How can we make this glass stronger, so if something hits it, it will not break?”
In your investigations you will be thinking like a scientist most of the time, but there will also be times when you will need to think like an engineer, and solve problems that will then help you to learn more about the natural world.
Look for more Letters from the Engineer. These will point out some of the times when thinking like an engineer is important.
2. Elicit ideas
Classroom Case

Elicitation
The Role of Elicitation Discussions
Available online at inquiryproject.terc.edu
Purpose of the discussion:
The purpose of this discussion is to elicit students' initial ideas about what happened to the water in which the ships once floated. View the Classroom Case to learn more about this discussion.
Engage students in the focus question
Why are these ships in a field?
Engage students by situating the learning in a real world context. Show students the set of images in the Power Point presentation or in the front of their Science Notebooks. Present the situation as a mystery as you share today's investigation question. If you need to distribute the science notebooks, tell students they will learn more about using the notebooks later in the class. For now, the focus is just on the images in the front section of the notebooks.
Ask students briefly to share ideas with a partner (Turn and Talk). Then have students report their ideas to the class. Ask students to listen carefully. Do they see connections between their own ideas and those of others? Do the suggestions of others inspire new ideas? Make a list of the different possibilities that students suggest. Expect all students to participate.
Explain that the class will not attempt to determine an answer to the investigation question today. As they investigate additional questions this new science unit students will find out what happens in situations such as the one shown in the photographs.
Summarize the discussion
Using the same language students have used, summarize their list of possible explanations.
3. Introduce the mini-lakes
Note: Each pair of students will build a mini-lake and track changes across an extended period of time.
Reiterate that the focus of the new science unit is to study water and the ways in which it can change or transform. Since it's difficult for the class to study an actual lake, students will build small lakes that they can study in the classroom.
Connect this lesson to the students' personal experiences by briefly eliciting their ideas about what natural materials they would expect to find in a lake.
What are some natural materials you might find in a lake?
Show the miniature lake you have made. It's simpler than an actual lake, but it has some of the important materials: sand, gravel, rocks, water, and something to hold all the components together. Explain that they'll use their mini-lakes to help understand some things about real lakes, and learn more about how those ships ended up in a field.
Note: This unit will introduce serveral kinds of models. This is a physical model or greatly simplied replica of a real lake.
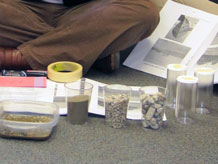
Students will start to make their lakes today. Show them the materials they will use to make their mini-lakes: sand, gravel, a few small rocks, fresh water, and the boxes that will hold everything together.
One important question they'll investigate is:
How do these lakes change, and how do they stay the same, as time passes?
Explain that since they will study their lakes for changes that occur, they'll need to know how much of each material is in their lakes. Before the materials are mixed together in the lakes, it's important to weigh each component. In the next session, they measure the volumes of the components.
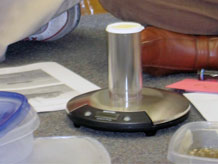
Introduce the digital scales
Show students the digital scale. There are some things they should know in order to get accurate weight measurements:
- Be sure the scale reads zero once it is turned on and before weighing something. If it does not read zero, push the button labeled ON / ZERO to set it at zero.
- Scientists use grams, not ounces, for weight measurement. Make sure a small “g” for “grams” is in the corner of the display. If the letters are “oz” (for ounces), push the button labeled KG / LB to change the weight measurement to grams.
- These scales are designed to weigh small objects. Overloading them may cause them to stop working. Be careful to not push down on them or place heavy items on them.
4. Weigh materials for the mini-lakes
Introduce Science Notebooks
Distribute Science Notebooks to the class and read the letter inside the front cover. Highlight the following points about notebook use:
- Scientists keep a written record of their questions, predictions, the data they collect (drawing, tables, graphs, notes, etc.), and their conclusions. You'll use your notebooks as scientists use theirs.
- Science classes begin with opening notebooks and recording the date. Notebooks are used throughout the class to record data, ideas, and questions as they arise.
- Use your notebooks to look back at predictions, procedures, data, conclusions, and ideas, so that procedures can be repeated. Your notebook will help you see how your ideas are growing and changing.
- Use your notebooks just for things related to science. Drawings or notes that are not related to your science work could make it more difficult to find information you need later on.
Identify pairs of students who will work together on a mini-lake. Distribute materials.
Introduce tare weight
Introduce tare weight with one of the empty plastic vials:
- No. There will be less than 150 grams of sand in the container, because the container and cover weigh something. To weigh 150 grams of sand, we'll need the scale to read 150 plus the weight of the container and cover.
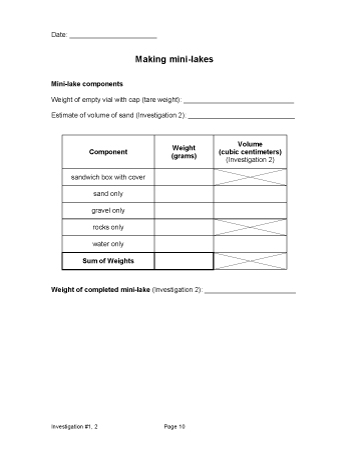
Introduce the term "tare weight" (tare rhymes with air). This is the term used to describe the weight of an empty container, including its cover. It's important to know tare weight in order to determine the weight of just the material that's in a container. Ask groups to put an empty vial and its cover on the digital scale. Is there agreement about the weight of the vial and cover? Once students determine the tare weight, have them record it on the [Making mini-lakes] page in their Science Notebooks.
Weigh materials
The weight on the index card indicates the weight of sand, gravel, and water students will add to the vials. There is no specific weight of rocks students should use.
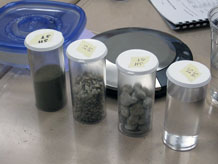
- Have students weigh the assigned amount of sand, gravel, and water in the vials. They can use the plastic spoons to make small adjustments to the weight.
- Remind them to include the cover as they weigh the vials of materials.
- Have them weigh the rocks by placing them directly on the scale and then placing them in the fourth vial.
- They should also weigh the sandwich box and cover, and record all weights in the Weight column of the table on the [Making mini-lakes] page of their Science Notebooks.
- Each pair should end up with four covered vials, which they will use in the next class. The vials of gravel, sand, and water should all have the same weights.
- Have pairs label their vials with their initials, using the masking tape.
Note: The only data students enter on this page during Investigation 1 are the vial tare weight (including cover) and the Weight data in the table. In Investigation 2 they will enter the Volume data, the weight of the completed mini-lake, and answer the reflection questions.
Tell students that in the next science class they will measure the volumes of the lake materials, add the materials to the sandwich boxes, and design their lakes.