How can we keep track of our mini-lake materials?
Plan Investigation 2
In this investigation, students continue to measure and record their mini-lake materials. They now measure the volume of each material they will add to their mini-lake. They study the relationship between weights and volumes, and then assemble their lakes.
Formative Assessment
Available online at inquiryproject.terc.edu

Do students understand that volume is the amount of 3-dimensional space sand (or gravel or water) takes up inside a vial?
Observe students’ estimation strategies to find evidence that they understand volume is a 3–dimensional measurement.
Keep these questions in mind as you interpret students' estimation strategies:
- If students measure the height of the sample, do they use this dimension to figure out the 3–dimensional volume?
- If they measure the area (footprint) of the sample, do they recognize there is another dimension?
- Do they find a way to replicate the volume of sample using cubes instead of gravel?
Students often confuse volume in 3 dimensions with height, area or perimeter. In the following video, identify the strategy and decide if it is viable or not.
As a next step, ask students to show and explain the strategy they used.
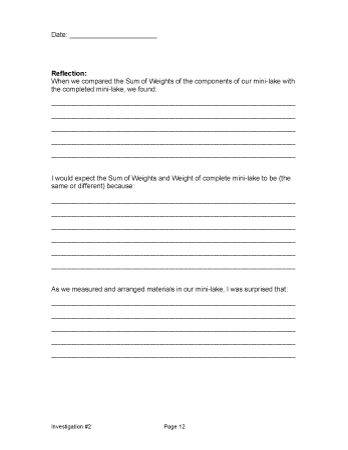
In the process, they are likely to discover that the weights of the individual materials in their mini-lake do not add up to the weight of the completed lake. Why the difference? When we expect one outcome and get another, it's important to make sense of the unanticipated result. This puzzle solving is particularly important in science, where the goal is to build new understandings of how the natural world "works." Such differences call for scientists to review their work and try to figure out why outcomes don't match expectations.
By the end of this investigation students will understand that weight and volume can help them to keep track of changes in their mini-lakes. They will also understand the importance of seeking an explanation for an unexpected outcome.
Learning Goals
- Understand the concept of volume
- Understand the importance of identifying possible sources of measurement error
| Sequence of experiences | ||
|---|---|---|
| 1. Review volume | All Class | 15 Mins |
| 2. Collect data and build mini-lakes | Pairs | 20 Mins |
| 3. Make meaning | All Class | 10 Mins |
NGSS Alignment
 Three Dimensional Learning
| Disciplinary Core Ideas | 5-PS1-1, 5-PS1-2 Materials have weight and take up space and are matter. |
| Practices | Developing and Using Models: students continue to measure the weight of all components of their sandwich box mini-lake system. The mini-lake is a stand-in for a real lake, a physical model students can study and modify. |
| Crosscutting Concepts | Stability and change: students measure and graph the weight of their tightly covered mini-lake which begins as a closed system. |
Materials and Preparation
For the class:
- Post the investigation question in a place where all students can see it.
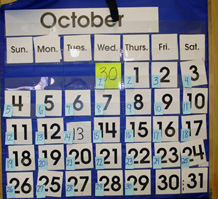
- On a classroom calendar, write the number 1 on the date students complete their mini-lakes (today), and add consecutive numbers for every day, including weekends, through the time period you expect you'll need to complete the curriculum unit.
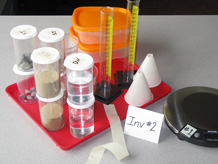
For each group:
- 1 digital scale; numbered by group
- 1 12in strip of masking tape
- 1 12oz cup holding 30 centimeter cubes
- 2 12oz cups
- 2 100ml graduated cylinders
- 2 funnels; conical paper cups with 1/2" snipped off the end
- 2 sandwich boxes with covers
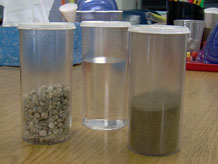
- 2 sets of four vials holding sand, gravel, rocks, and water (from previous investigation)
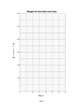
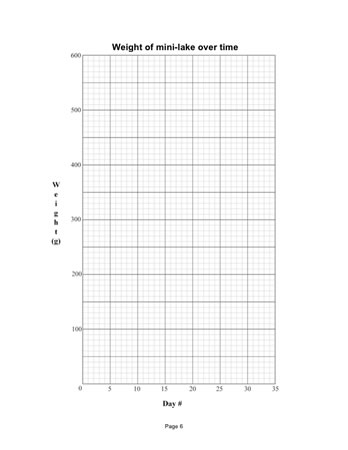
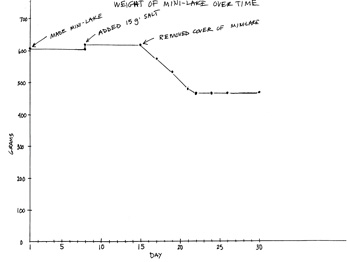
Note: Your students will need to know how to work with a 2-axis time plot to make entries into the Weight of mini-lake over time plot. See Step 2: Record the weight of the completed mini-lake.
Notebook Pages
1. Review volume
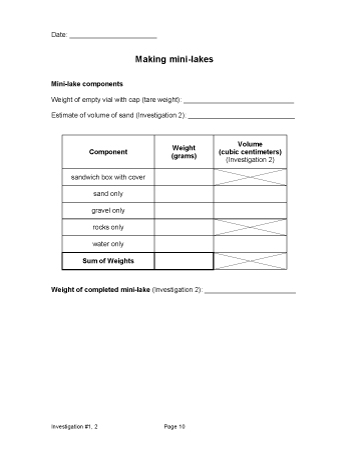
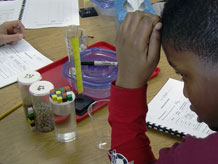
In the last session, students carefully weighed each material that will be used to make their mini-lakes. Today they measure the volume of the sand, gravel, and water and then construct their mini-lakes. They don't measure volume of the rocks, which have been weighed and can be counted.
Explain that knowing the amount of these materials will help them to keep track of changes that may occur in their mini-lakes. They have one more set of important measurements to make.
Introduce the investigation question:
How can we keep track of our mini-lake materials?
Distribute materials. Ask students to leave the caps on the vials for now and to set the vial of rocks aside. The rocks will be the last material added to the mini-lakes.
Review the concept of volume
- The volumes (amount of space each material takes up) are different. The water sample has the greatest volume. The sand sample has the least volume.
Highlight the three-dimensional nature of volume measurement, for example, by enclosing a space with your two hands, as if you were holding a large ball.
Have students pick up a centimeter cube. The cubic centimeter is the unit of measure for volume, just as the gram is the unit of measure for weight. One cube takes up one cubic centimeter of space.
Estimate volume
Ask students to estimate the volume of their sample of sand.
Note: The volume of sand ranges from approximately 75cc to 95cc, depending on the weight a team was assigned. The goal of having students make this estimate is to see if they focus on the amount of space taken up by the sand. Do they confuse volume with the height of sand in the vial, the perimeter of the vial, the area of the vial bottom, or possibly the weight of the sand? Students are not expected to generate an accurate estimate.
Tell students to work in pairs, and that they'll have just a few minutes to make this volume estimate and record it in their Science Notebooks. Note that different pairs of students have different volumes of sand. Students record their data on the [Making mini-lakes] page in their Science Notebooks.
Ask students to share their estimates. Listen for estimates that seem surprisingly low (did they confuse volume with height, area, or perimeter?), and ones that are equal to the weight of their sand (did they confuse volume with weight?). Ask a few students to describe how they arrived at their estimate.
2. Measure volumes and assemble mini-lakes

Introduce the graduated cylinder
Show students a graduated cylinder. Point out that it is a tool for measuring the volume of liquids or the bulk volume of granular materials such as sand or gravel. The numbers on the cylinder refer to milliliters (ml). Each milliliter takes up the same amount of space as a cubic centimeter (1cc = 1ml).
The paper cups with the tips cut off will serve as funnels when pouring materials into the graduated cylinders. MEASURE THE VOLUME OF THE DRY MATERIALS FIRST.
What is bulk volume? Bulk volume is a term used to define the amount of space taken up by a granular material such as salt, sand, or gravel. Bulk volume includes the volume of the grains and the volume of the spaces between the grains. To measure bulk volume, pour the granular material into a graduated cylinder and read the volume as if it were a liquid.
Measure volumes and assemble mini-lakes
Have students use the steps outlined in their Science Notebook to guide them through the process of measuring the volumes and assembling their mini-lakes. Students record their volume data on the [Making mini-lakes] page in their Science Notebooks.
Add these reminders:
- Complete the steps in order.
- Students should keep the vial of water covered and wait to measure its volume until they are ready to add water to the mini-lakes.
- Students will need to measure the volume of water in two steps, because the graduated cylinder will not measure more than 100cc of water at a time. Note: You can let students figure this out for themselves or call it to their attention ahead of time.
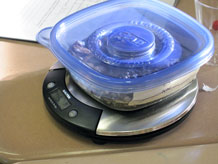
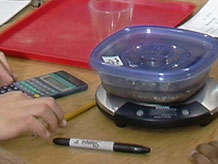
Record the weight of the completed mini-lake
In addition to recording the weight of the completed mini-lake on the [Making mini-lakes] page in their Science Notebooks, students need to record it in two other places:
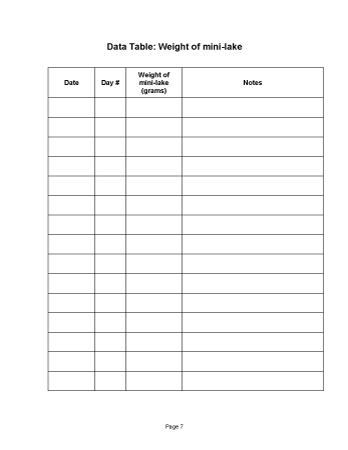
- In the [Data Table: Weight of mini-lake]:
Have students find the Data Table in their Science Notebooks. The classroom calendar should provide students with both the date and the "day number." Today is Day 1 of the mini-lakes' existence. Recording the "Day" is important. - In the graph labeled [Weight of mini-lake over time]:
Demonstrate how to add the weight of the completed mini-lake to the graph in the Science Notebook. Some students will need help interpreting the scales on the horizontal (Day #) and vertical (Weight g) axes. If a student forgets to put a data point on the graph, this can be easily fixed using the data table.
Each time students weigh their mini-lake, they will record the weight in both the table and the graph. Explain that, by weighing the completed lake and recording that weight today, students will be able to tell if the weight has changed the next time they weigh it.
Students should answer the [Reflection] questions in their Science Notebooks.
Letter from the Engineer
Scientists, Engineers, and Models
Just as you have done with your mini–lakes, scientists and engineers often create what they call a physical model of something in the real world. Like your mini-lakes, these physical models are not toys; they are tools designed to help us to learn more about the way something in the world works. In this case you are studying a part of the natural world — a lake. Building and investigating a physical model of a lake is helpful because a real lake is very large and not something you can easily visit every day to investigate it directly.
Models need to be designed very thoughtfully. For example, putting sand and rocks into your mini-lakes is fine because most real lakes have sand and rocks in them. If you decided to put blue Jell–O in your mini–lake, it might still look like a lake but you would not learn anything about water.
Some physical models are larger then the actual object, and others are smaller. The size depends on what will be helpful or useful. A globe is a physical model of the Earth. Because it is so small, you can see whole oceans, continents, large rivers and lakes, and see where the different countries are located. A model of an ant might be much larger than an actual ant, so you could see things and learn things that you might not discover on an actual ant.
3. Make meaning
Review norms for science discussions
Explain that an important part of science is explaining our ideas and asking questions so we can all learn from each other. Remind students that it's important to listen to each other, support their ideas with evidence, and build on each other's ideas.
Purpose of the discussion
The purpose of this discussion is for students to jointly construct explanations for why the weight of the completed lake differs from the weight of the sum of its parts, and to understand the limitations of their digital scales.
Scales: The weight of the completed lake is likely to be different than the sum of the parts. Why? The classroom scales round weight to the closest gram. This means that, for each individual component of the mini-lakes, the measured weight can differ from the actual weight by plus or minus a half gram. The measured weight of the completed lake should be more accurate than the sum of the measured weights of the parts.
Engage students in the focus question
How do you explain the difference between the weight of the completed lake and the weight of the sum of its parts?
Ask students to return to the [Making mini-lakes] page in their Science Notebooks. Direct their attention to two places where they have recorded weight: the row in the table labeled Sum of the weights; and the line of text below the table that reads Weight of the completed mini-lake.
Did students get the same weight in both places? For most, the two numbers will be different.
Give students time to consider the data and offer responses; this is a challenging question. Listen carefully to student ideas, ask them to explain their reasoning, and encourage them to build on or add to each other's ideas.
Which weight do you think is more reliable, and why do you think so?
If no one mentions that the scales sometimes flickered between two weights, ask:
How many of you noticed your scale flickering back and forth between one number and another? For example, the scale might read 120 … 119 … 120 … 119 … 120.
- The weight was in between two numbers and the scale does not show fractions or parts of a gram. Even when the scale is not flickering, the weight it displays is always rounded to the closest gram.
- Weighing the whole lake gives us a more reliable weight because it involves just one measurement, which could be inaccurate by as much as a half-gram. Weighing each of the 5 components means that there are 5 measurements, each of which could be inaccurate by as much as a half-gram.
Summarize the discussion and recap the investigation
Using the same language students have used, summarize their main ideas. Include the following key ideas:
- The classroom scales do not measure fractions of a gram so they are always rounding to the closest gram. This rounding is a possible source of error when using the scales.
- If you put an object on the pan of your scale and it reads 50 grams, the weight could be 49.5 or 50.4 or any value in between.
- Because every measurement can be as much as a half–gram different than the actual weight, the weight of the completed mini-lake is likely to be more accurate than the sum of the weights of the different materials.
As you recap the investigation, check for understanding of these points:
- The mini–lake is a simplified, small version of a real lake.
- Measurements of the weight and volume will help students keep track of any changes that may occur over time.
- Today students considered possible sources of error in their measurements. They will continue to keep the accuracy of their scales and sources of error in mind throughout the unit.
Weighing the Mini-lakes
Students are asked to weigh their mini-lakes in just 6 of the 18 Investigations. However, collecting weight data more frequently - even daily - will give students a more complete story of how this system changes over time.
In Investigations 2, 5, and 7, the weighing is integral to the work, and should happen as part of those Investigations. Time for weighing the mini-lakes is also built into Investigations 8, 9, and 17, but the weighing is separate from the focus of those specific Investigations.
If possible, except for Investigations 2, 5, and 7, have students weigh their mini-lakes before school, just before science class, or during lunch or recess. This will allow students to collect the additional data, and will open up more time for discussions or writing in Investigations 8, 9, and 17.
A sneak preview:
The graph Weight of Mini-Lake over Time is an example of what students develop over the course of the next few weeks. Students add data points to the graph as they collect the data. They will not add explanation notes to the graph until after they have finished adding all of the data points.
Before Investigation 4: Introduce 315 Dots Per Page
Sometime before Investigations 4 or 5, set aside five minutes, outside of science class, to introduce 315 Dots per Page. Let this experience stand on its own for now. This gives students time to mull over the idea that when very tiny particles (or dots) are widely spread apart from one another, they are too small and too spread out to see.
When they get to Investigation 5, students find their experience with the dot sheets helpful as they try to explain why dissolved salt is invisible. The experience can also help them explain why water particles become invisible after evaporation.