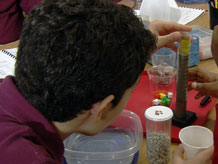
How can we keep track of our mini-lake materials?
2. Measure volumes and assemble mini-lakes

Introduce the graduated cylinder
Show students a graduated cylinder. Point out that it is a tool for measuring the volume of liquids or the bulk volume of granular materials such as sand or gravel. The numbers on the cylinder refer to milliliters (ml). Each milliliter takes up the same amount of space as a cubic centimeter (1cc = 1ml).
The paper cups with the tips cut off will serve as funnels when pouring materials into the graduated cylinders. MEASURE THE VOLUME OF THE DRY MATERIALS FIRST.
What is bulk volume? Bulk volume is a term used to define the amount of space taken up by a granular material such as salt, sand, or gravel. Bulk volume includes the volume of the grains and the volume of the spaces between the grains. To measure bulk volume, pour the granular material into a graduated cylinder and read the volume as if it were a liquid.
Measure volumes and assemble mini-lakes
Have students use the steps outlined in their Science Notebook to guide them through the process of measuring the volumes and assembling their mini-lakes. Students record thier volume data on the [Making mini-lakes] page in their Science Notebooks.
Add these reminders:
- Complete the steps in order.
- Students should keep the vial of water covered and wait to measure its volume until they are ready to add water to the mini-lakes.
- Students will need to measure the volume of water in two steps, because the graduated cylinder will not measure more than 100cc of water at a time.
Record the weight of the completed mini-lake
In addition to recording the weight of the completed mini-lake on the [Making mini-lakes] page in their Science Notebooks, students need to record it in two other places:
- In the [Data Table: Weight of mini-lake]:
Have students find the Data Table in their Science Notebooks. The classroom calendar should provide students with both the date and the "day number." Today is Day 1 of the mini-lakes' existence. - In the graph labeled [Weight of mini-lake over time]:
Demonstrate how to add the weight of the completed mini-lake to the graph in the Science Notebook. Some students will need help interpreting the scales on the horizontal (Day #) and vertical (Weight g) axes.
Each time students weigh their mini-lake, they will record the weight in both the table and the graph. Explain that, by weighing the completed lake and recording that weight today, students will be able to tell if the weight has changed the next time they weigh it.
Students should answer the [Reflection] questions in their Science Notebooks.
Letter from the Engineer
Scientists, Engineers, and Models
Just as you have done with your mini–lakes, scientists and engineers often create what they call a physical model of something in the real world. Like your mini-lakes, these physical models are not toys; they are tools designed to help us to learn more about the way something in the world works. In this case you are studying a part of the natural world — a lake. Building and investigating a physical model of a lake is helpful because a real lake is very large and not something you can easily visit every day to investigate it directly.
Models need to be designed very thoughtfully. For example, putting sand and rocks into your mini-lakes is fine because most real lakes have sand and rocks in them. If you decided to put blue Jell–O in your mini–lake, it might still look like a lake but you would not learn anything about water.
Some physical models are larger then the actual object, and others are smaller. The size depends on what will be helpful or useful. A globe is a physical model of the Earth. Because it is so small, you can see whole oceans, continents, large rivers and lakes, and see where the different countries are located. A model of an ant might be much larger than an actual ant, so you could see things and learn things that you might not discover on an actual ant.


