What are some properties of air? (3)
1. Ask the question
Today students will investigate another property of air that scientists call thermal expansion. Later the class will complete their list of properties in answer to the investigation question:
What are some properties of air?
The temperature of air can change. We've all felt the difference between warm summer air and colder winter air. Explain that students are about to collect some evidence to answer the question What happens to the volume of air as it's warmed or cooled?
Demonstrate warming and cooling air
Note: The following teacher - led demonstration works well as long as the water in one bucket is noticeably warmer than room temperature, and the water in the other bucket is noticeably cooler than room temperature.
Show students the 1L bottle of room temperature air. Ask them to predict and explain their reasoning.
- What do you predict will happen to the volume of air in this bottle if we warm it? Will it stay the same, become larger, or become smaller?
- What if we cool it?
Provide a few minutes for students to gather their ideas. Then ask for a few people to share their ideas with the class. Check for students' understanding of "volume" - the amount of space the air in the bottle takes up. If the volume of the air becomes larger, it will need more space than the inside of the bottle - where is there additional space for it to move to?
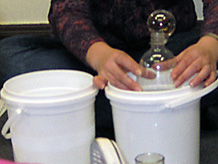
Introduce a way to test students' predictions by putting a flexible material -- a thin soap film -- over the top of the air-filled bottle, changing it from an open to a closed system, and do the following demonstration.
Narrate your procedure as you move through the steps.
- Half-fill two plastic buckets, one with hot water and one with cold water.
- Dip the opening of a 1L bottle into the bubble mix to create a soap film that seals the room temperature air in the bottle. This turns the bottle into a closed system.
- Turn the bottle upright and place the lower half of the bottle into the hot water to warm the air.
- Place the lower half of the bottle into the cold water to cool the air.
- Repeat the process.
Note: It's important that students have an opportunity to share their ideas about why the bubble formed, but it's not important that they develop a scientifically accurate explanation at this moment. Soon they will see what happens when air is warmed and cooled in the Particle Magnifier.
Provide a few minutes for students to gather ideas about what's happening to the air to make the bubble form.
What did you observe?
- When the air was warmed, a bubble formed.
- When the air was cooled, the bubble disappeared and the soap film slid down into the bottle.
Why do you think the bubble formed?
- The warmed air expanded.
- Air entered the bottle.
- Warm air rises.
If students claim that the bubble formed because warm air rises, turn the bottle so that the bubble is lower than the bottom of the bottle. The warmed air will not rise to the now elevated bottom of the bottle, and the bubble will not deflate.
Note: The temperature increased meaning the air particles inside the bottle were moving faster, colliding more forcefully so the air expanded, pushed on the soap film, and caused a bubble to form. When the bottle of air was cooled, the particle motion decreased, so the air contracted and the soap film moved down inside the bottle.